Make it, break it, make it work for you, and then share it
Hacking the Nunchuck

Rogue Part 4: Hacking the Nunchuck
Back to Part 3
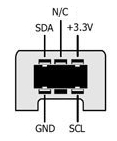
This image is looking into the end of the nunchuck cable (the perspective you'll see if you want to jam some wires in). From this perspective, the two pins on the top, marked as N/C and +3.3v are jumpered together inside the connector housing. Most likely, one pin is power, and the other is a "device present" flag for the Wii remote. I prefer keeping wobbly connections as far apart as possible, so won't be using the center top pin when I first wire it up. The majority of images I see on the web lean towards the outer pin being power, not the center one.
Thanks to Tod Kurt at todbot.com! As we've followed the rabbit trail trying to get working with the nunchuck, it looks like nearly everyone is building on his work. His success with his adapter board really pushed me towards using the outer pin as power, since that's how he laid out his board.
We're considering Tod's code from https://github.com/todbot/wiichuck_adapter, but may need to tweak the code since we're using an Arduino MEGA ADK which has dedicated I2C pins.
We're also considering the code from https://github.com/GabrielBianconi/ArduinoNunchuk
The first part we need to work on is connecting some wires that won't wobble too much and short anything out. I like Tod's wiichuck adapter, but it'd only be useful for a couple of days. We'll need a connection that will survive lots of walking around once we get Rogue up and playing. Since we're using a MEGA ADK, we'd have to fan out the connectors, so will be soldering wires no matter what.
We'll be using a pair of NRF24L01+PA+LNA ISM transceivers with external antennas for the link between Rogue and the remote control. Hopefully we can get some good distance, so we can sit back and have fun rather than chase around following him. We're going to start with the code from https://github.com/TMRh20/RF24. They just arrived. I expected them to be small, but not as small as they actually are. NICE! They will be really easy to fit into the remote control and into Rogue. I have an old trashed WRT54G...I'm probably going to rip out the TNC cables and attach them to the nRF24s so that I can better position the antennas, and possibly use those high-gain antennas sitting in the box beside it.
First Attempt:
The first attempt was a bust. I started with the example code from the library, which reads the nunchuck values and spews them to the Serial monitor. That'll give me a pretty clear indication of functionality and an eyeball on the zero points as well as min- and max- x and y. Any time I connect SDA, the Arduino freezes. I'll try adding pull-up resistors. Since the Wii remote is the host device, it's likely that it has the pullups. Remember, when you have two equal resistors in parallel, the resistance is cut in half. Too low of a resistance caused by one on each end can prevent the devices from properly pulling the signals low. ;)